
Dec 31, 2018
S/MIME Part 2: Signed, Sealed, and Delivered through SparkPost
In deze aflevering, zullen we:
Enkele eenvoudige commandoregeltools installeren voor het ondertekenen en versleutelen van e-mail
Ontvang uw afzendersleutel / certificaat voor ondertekening
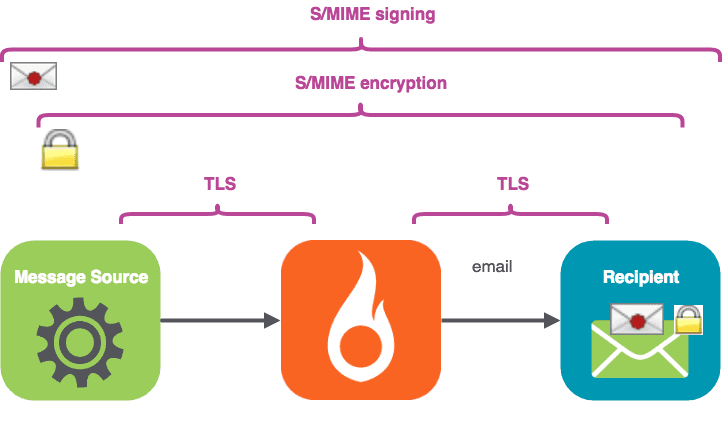
Stuur een ondertekend bericht via SparkPost, en bekijk het ontvangen bericht
Haal optioneel uw ontvanger certificaat voor encryptie
Stuur een ondertekend en versleuteld bericht via SparkPost, en bekijk het ontvangen bericht
Probeer een handige standalone tool "mimeshow" om de interne aspecten van e-mailbestanden te bekijken.
OK - laten we beginnen!
1. Installeer het gereedschap
De demonstration tools are in Github hier, complete with installation instructions. You might notice the “build passing” logo – Travis and pytest automatically check the build status. Note these tools are not officially supported by SparkPost, but I’ve tried to make them robust and easy to use.
If you have some acquaintance with Python and pip, installation should feel pretty familiar. De Pipfile takes care of the external dependencies automatically for you. Once it’s done, you can check everything’s installed by running
./sparkpostSMIME.py -h
Je zou de vriendelijke helptekst moeten zien. Vervolgens moeten we...
2. Ontvang uw afzendersleutel / certificaat voor ondertekening
Als je al een sleutelbestand hebt voor je verzendende identiteit, kun je doorgaan. Anders zijn hier twee opties om uit te kiezen:
a) Zelfondertekende testsleutel/certificaat (niet extern geldig)
If you’re just testing, you can make “self signed” certificates and keys for an email address using the command line tool openssl on Linux, following a procedure such as deze. At the end of that process, you’ll have a smime.p12 file. Rename this file to match your sending identity, including the @ sign, for example, alice@example.com.p12 .
or
b) Extern geldige sleutels/certificaten
If you want to get externally valid keys / certificates that enable you to sign, thier’s a list of providers here. I found Comodo works well (free for non-commercial use), and it’s easier than the self-sign procedure above. Follow the sign-up process, receive your validation mail, and be sure to open the link in Firefox. Go to Firefox Preferences / Privacy and Security. Scroll to Certificates / View Certificates:

Select your certificate, and use the “Backup” option to save as a file in PKCS12 format (add the file extension .p12 to your filename) which carries the private key and the public certificate chain.

Geef een wachtwoord om het .p12-bestand te beveiligen:

Genereer afzonderlijke publieke (.crt) en private (.pem) sleutelbestanden
Of je nu a) of b) hebt gebruikt, je hebt nu een .p12-bestand voor je afzenderidentiteit. Dat is een grote stap voorwaarts - pak nu een koffie!
Nu moeten we aparte publieke en private sleutelbestanden genereren zoals dit - met vervanging van uw eigen e-mailadres voor het voorbeeld. (Mac OSX en Linux):
openssl pkcs12 -in alice@example.com.p12 -clcerts -nokeys -out alice@example.com.crt openssl pkcs12 -in alice@example.com.p12 -nocerts -nodes -out alice@example.com.pem
You’ll need to enter the password you provided earlier. Note those backslashes \ are used to ontsnappen the @ sign – not separating the names of a directory path (that’s a forward-slash / on Mac OSX and Linux).
If you’re using Windows, there are openssl implementations available such as the MINGW64 one built into the Git commandoregeltools, but I found it tended to just lock up. You’ll probably find it easier and quicker to do this on Linux and then copy your files over. Those same Git tools for Windows come with a nice ssh client you can use to login to a Linux box, such as an Amazon EC2 instance.
2.1 Een bericht ondertekenen
Er is al een dummy sleutel/cert en e-mail bronbestand in de tests directory voor alice@example.com, dus je kunt al wat output krijgen voordat je je eigen sleutels hebt. Typ gewoon het volgende:
cd tests ../sparkpostSMIME.py example_email1.eml --sign
En je krijgt:
To: Bob <bob@example.com> From: Alice <alice@example.com> Subject: A message MIME-Version: 1.0 Content-Type: application/x-pkcs7-mime; smime-type=signed-data; name="smime.p7m" Content-Transfer-Encoding: base64 Content-Disposition: attachment; filename="smime.p7m" MIIKXAYJKoZIhvcNAQcCoIIKTTCCCkkCAQExDzANBglghkgBZQMEAgEFADCCAQoGCSqGSIb3DQEH AaCB/ASB+VRvOiBCb2IgPGJvYkBleGFtcGxlLmNvbT4NCkZyb206IEFsaWNlIDxhbGljZUBleGFt : :
You can’t actually send emails from example.com via SparkPost unless you own that domain, so the next step is to use your own key and send a signed message from your own domain.
3. Stuur een ondertekend bericht via SparkPost
Now let’s use a real sending domain, set up as per the SparkPost Nieuwe Gebruikershandleiding. We have the sender certificate and key files in the current directory:
steve@thetucks.com.crt steve@thetucks.com.pem
The file tests/declaration.eml is included in the project. It’s just a text file, so you can customize the From: address to suit your own sending domain and the To: address to suit your test recipient. The beginning of the file looks like this:
To: Bob <bob.lumreeker@gmail.com> From: Steve <steve@thetucks.com> Subject: Here is our declaration MIME-Version: 1.0 Content-Type: text/plain; charset=utf-8; format=flowed Content-Transfer-Encoding: 7bit Content-Language: en-GB When in the Course of human events it becomes necessary …
Stel uw API-sleutel in:
export SPARKPOST_API_KEY=<<Put your API key here>>
Stuur de e-mail:
./sparkpostSMIME.py tests/declaration.eml --sign --send_api
Je zult het zien:
Opened connection to https://api.sparkpost.com/api/v1 Sending tests/declaration.eml From: Steve <steve@thetucks.com> To: Bob <bob.lumreeker@gmail.com> OK - in 1.15 seconds
Een seconde of wat later arriveert de e-mail in Bob's inbox. Thunderbird geeft het weer met een rode stip op de envelop, wat duidt op een geldige handtekening van de afzender.

Succes! Drink die koffie op, je hebt het verdiend. Als u problemen ondervindt, controleer dan of uw Van: adres in het e-mailbestand overeenkomt met de naam van uw .crt en .pem bestanden.
4. Het versleutelen van berichten
Om een bericht te versleutelen heb je de publieke sleutel van je ontvanger nodig in de vorm van een certificaat. Dit is een tekstbestand dat er als volgt uitziet:
Bag Attributes friendlyName: s COMODO CA Limited ID #2 localKeyID: 32 84 AB 9C 56 5C 80 C6 89 4D 40 46 DD D4 7C 71 E8 CD ED C1 subject=/emailAddress=bob.lumreeker@gmail.com issuer=/C=GB/ST=Greater Manchester/L=Salford/O=COMODO CA Limited/CN=COMODO RSA Client Authentication and Secure Email CA -----BEGIN CERTIFICATE----- looks like random characters in here -----END CERTIFICATE-----
Er is een dummy ontvanger certificaat voor bob@example.com in de tests directory, zodat je ermee kunt oefenen voordat je een echt certificaat hebt:
cd tests ../sparkpostSMIME.py example_email1.eml --sign --encrypt
Je zult het zien:
To: Bob <bob@example.com> From: Alice <alice@example.com> Subject: A message MIME-Version: 1.0 Content-Type: application/pkcs7-mime; smime-type=enveloped-data; name=smime.p7m Content-Transfer-Encoding: base64 Content-Disposition: attachment; filename=smime.p7m MIIRwQYJKoZIhvcNAQcDoIIRsjCCEa4CAQAxggKlMIICoQIBADCBijCBhDELMAkG :
You’ll notice the length of output is quite a bit longer than with an gecodeerd message because it carries a lot of extra informatie as well as the scrambled message itself.
4.1 Een versleuteld, ondertekend bericht versturen via SparkPost
Let’s send an encrypted message to a real email address. You can follow the same process as before (self-signed or a provider such as Comodo) to get a public key / certificate for your own recipient addresses. You only need the .crt file – the recipient does not ever need to give you their private key (.p12 and .pem files).
I have the file bob.lumreeker@gmail.com.crt for my intended recipient – matching the From: address in my file.
Hier is het te versturen commando:
./sparkpostSMIME.py tests/declaration.eml --sign --encrypt --send_api
Ik begrijp het:
Opened connection to https://api.sparkpost.com/api/v1 Sending tests/declaration.eml From: Steve <steve@thetucks.com> To: Bob <bob.lumreeker@gmail.com> OK - in 1.168 seconds
De mail verschijnt in Thunderbird met het "red dot" handtekeningpictogram en het "padlock" gecodeerde pictogram.

You can send complex HTML-based email with links and images just as easily, such as the one shown in Part 1. Some clients such as Thunderbird ask for permission to display external links and images within encrypted S/MIME messages, but alleen ondertekend messages display well in clients including Thunderbird and Gmail:


Het uitrolmenu toont "Geverifieerd e-mailadres".
Further thoughts & things to be aware of
Deze tool gebruikt een supersimpele aanpak om de nodige sleutels binnen te halen - het zoekt gewoon naar bestanden met een naam in de huidige directory. Meer complexe regelingen, zoals het bewaren van alle sleutels in een database, zouden gemakkelijk kunnen worden toegevoegd, maar ik wilde de code zo eenvoudig mogelijk houden.
U kunt andere ontvangers opnemen met Cc: en Bcc: en zij zullen worden afgeleverd; dit kan nuttig zijn voor archiveringsdoeleinden. Ondertekende berichten worden ontvangen en kunnen worden weergegeven door andere ontvangers, compleet met handtekening. De tool verwijdert de Bcc: header van het afgeleverde bericht (zoals een desktop mail client zou doen).
Om ervoor te zorgen dat berichten ongewijzigd door SparkPost gaan (wat de ondertekening zou kunnen verbreken), stelt de tool API-opties in voor "transactionele" mailing, met open en klik-tracking uitgeschakeld.
Als u codering gebruikt, bedenk dan dat het programma daarvoor het enige To: adres oppikt. De andere ontvangers kunnen het bericht alleen decoderen als ze de privésleutel van de ontvanger van het bericht hebben. Als u bijvoorbeeld alleen secundaire ontvangers gebruikt om bij te houden welke leveringen zijn gedaan, is dat misschien toch in orde.
Getekend, verzegeld afgeleverd... Ik ben de jouwe.
That’s our quick overview of how to sign, seal and deliver S/MIME messages through SparkPost. Quick reminder: the demo project is in Github here, I’ve tried to make it easy to install and use.
Bonusfunctie: weergave van MIME-onderdelen met "mimeshow".
RFC822 MIME multipart bestand internals zijn vrij complex om te lezen voor mensen. Het project bevat een standalone gereedschap om dit gemakkelijker te maken, genaamd mimeshow.
Dit neemt alle e-mailbestanden die u hebt (niet alleen S/MIME-bestanden) en toont de interne structuur. Hier is een voorbeeld:
./mimeshow.py testcases/img_and_attachment.eml
Je zult het zien:
To Bob <bob.lumreeker@gmail.com> From Steve <steve@thetucks.com> Subject Testing attachments etc MIME-Version 1.0 Content-Type multipart/mixed; boundary="------------7D48652042860D0098C65210" Content-Language en-GB Content-Type multipart/alternative; boundary="------------58C0BF87598336550D70EB95" Content-Type text/plain; charset=utf-8; format=flowed Content-Transfer-Encoding 7bit Content-Transfer-Encoding quoted-printable Content-Type text/html; charset="utf-8" Content-Type application/pdf; name="sparkpost-datasheet-tam-technical-account-management.pdf" Content-Transfer-Encoding base64 Content-Disposition attachment; filename="sparkpost-datasheet-tam-technical-account-management.pdf"
You can also use as a filter to give a human-readable summary of sparkpostSMIME output:
./sparkpostSMIME.py tests/declaration.eml --sign --encrypt | ./mimeshow.py
Je zult het zien:
To Bob <bob.lumreeker@gmail.com> From Steve <steve@thetucks.com> Subject Here is our declaration Content-Language en-GB MIME-Version 1.0 Content-Type application/pkcs7-mime; smime-type=enveloped-data; name=smime.p7m Content-Transfer-Encoding base64 Content-Disposition attachment; filename=smime.p7m
Eindelijk...
To recap – we’ve installed some simple command-line tools for signing and encrypting email (the Github repo is here, complete with installation instructions).
We kregen onze afzendersleutel / certificaat voor ondertekening, en stuurden een ondertekend bericht via SparkPost. We kregen een ontvanger certificaat voor encryptie, en stuurden vervolgens een ondertekend en versleuteld bericht via SparkPost.
Ten slotte hebben we het handige standalone programma "mimeshow" geprobeerd om de interne aspecten van e-mailbestanden te bekijken.
dat is het voor nu! Tot ziens!