
Aug 30, 2019
Deploying Signals for On-Premises: PowerMTA Integration
Laten we eens duiken in de details van het instellen van PowerMTA voor SparkPost signalen. Je hebt nodig:
Een host om de nieuwste versie van PowerMTA op te draaien - nieuw of een bestaande machine
A SparkPost account with API key permission for “Incoming Events: Write” zoals hier beschreven
We zetten PowerMTA op om evenementen te streamen naar je SparkPost account, daarna kun je het volgende gebruiken:
Firstly, install (or upgrade) to PowerMTA 5.0 r4 or later, following the gebruikelijke v5.0 installatie-instructies which are pretty straightforward. Then we’ll work through the following steps:
Configureer PowerMTA connector to SparkPost Signals
Engagementtracking instellen met een aangepast traceringsdomein
Selecteer welke PowerMTA verkeersstromen moeten worden gerapporteerd aan Signals
Testen of uw gebeurtenissen signalen bereiken
Bekijk hoe je betekenisvolle namen kunt gebruiken die goed naar voren komen in de rapportage.
We behandelen ook de andere specifieke PowerPMTA-instellingsaspecten die gebruikt worden in onze Signals-demo:
FBL-gebeurtenissen (Spam Complaints) en externe (out-of-band) bounces
Injectieconfiguratie, inclusief DKIM
FBL- en OOB-configuratie
VirtualMTA opzet en naamgeving (en hoe dit verschijnt in je SparkPost Signals rapporten)
Finally, there’s a “bonus feature” with code to ensure your campaign names are compatible with PowerMTA X-Job name conventions.
Configure PowerMTA connector
De Signals configuration is described in the 5.0 Gebruikershandleiding sectie 10.1. Here we’ll start with “Use Case #2”, which enables Signals for all traffic from this PowerMTA host, and enable SparkPost engagement tracking.
# # SparkPost Signals # <signals> api-key ##my ingest API key here## upload-url https://api.sparkpost.com/api/v1/ingest/events log-verbose true min-ruimte 1G engagement-tracking sparkpost # this turns on the open and click tracking in PowerMTA customer-id 123 # Your SparkPost account number here </signals> schakel signalen in true
Dit is wat elk kenmerk doet:
api-key
Dit is uniek voor je SparkPost account, het is de waarde die je eerder van SparkPost kreeg.
upload-url
Dit moet overeenkomen met het adres van je SparkPost API service, of het nu US of EU is. Voor meer info zie hier. De gebruikelijke waarden zijn:
SparkPost (VS): https://api.sparkpost.com/api/v1/ingest/events
SparkPost EU: https://api.eu.sparkpost.com/api/v1/ingest/events
log-verbose
Deze richtlijn is optioneel en geeft, indien ingeschakeld, wat meer info in het pmta.log bestand, wat nuttig kan zijn tijdens de setup om te bevestigen dat alles correct werkt. Elke minuut, zelfs als er geen verkeer is, zul je zien:
2019-07-26 11:47:57 Signalen: 0 bestanden ontdekt
Bij verkeer zie je zoiets als:
2019-07-26 11:50:57 Signalen: Ontdekt sp1-000000003FBD.json 2019-07-26 11:50:57 Signalen: Overgedragen sp1-000000003FBD.json met succes. 2019-07-26 11:50:57 Signalen: 1 bestand ontdekt, 1 bestand succesvol overgedragen
min-ruimte
Dit vertelt PowerMTA de schijfruimte drempel waarop het moet beginnen met het verwijderen van de oudste SparkPost JSON gebeurtenis bestanden om ruimte te maken voor nieuwe bestanden als de schijfruimte bijna op is.
schakel signalen in
This tells PowerMTA to upload to Signals, in this case globally for all traffic (more info hier, voor v5.0). You can be more selective about what traffic streams to upload if you wish.
You can also mark particular PowerMTA traffic to be reported as belonging to a SparkPost subaccount – this is another way to distinguish one particular traffic stream from another.
engagement-tracking, klant-id
PowerMTA’s Engagement Tracking solution defaults naar de tracking domain for the SparkPost US-hosted service. You specify your SparkPost numeric customer ID; here’s instructies om het te vinden.
tracking-domain
Voor SparkPost EU accounts, voeg de volgende regel toe:
tracking-domain pmta.eu.spgo.io # dit is het eindpunt voor SparkPost EU
Aangepast volgdomein
Als u liever uw eigen trackingdomein gebruikt (dit is beter vanuit het oogpunt van deliverability), doe dan het volgende:
Create tracking domain with your DNS provider by creating a CNAME record. This will usually be a subdomain of your top-level domain, e.g. track.mycompany.com .
track.mycompany.com CNAME pmta.spgo.io # als u een SparkPost US account heeft track.mycompany.com CNAME pmta.eu.spgo.io # als u een SparkPost EU account heeft
You can also use HTTPS tracking domains, although this is more involved (see SparkPost configuration steps here).
Register tracking domain in your SparkPost account, and controleer het. Wait a few minutes before trying this, to allow your DNS changes to propagate through the Internet, depending on your DNS provider.
Configureer PowerMTA om dat domein te gebruiken in plaats van de standaard, met
tracking-domain yourdomain.com # Zet hier uw eigen domein neer
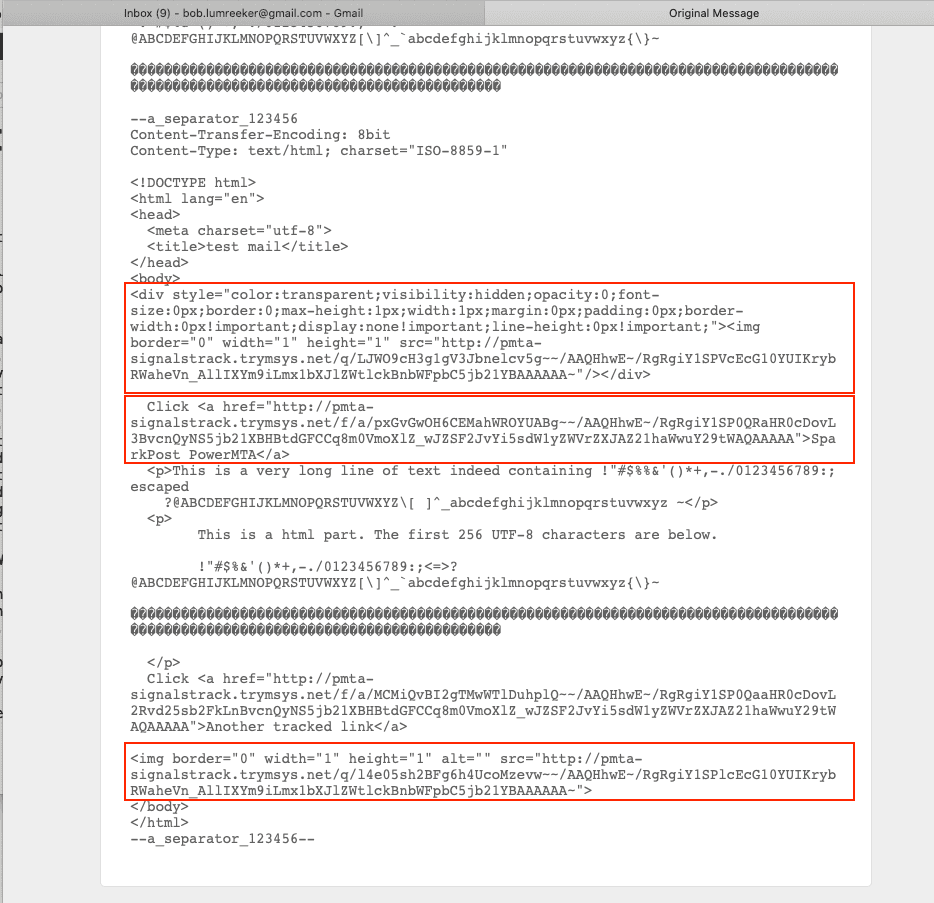
U kunt controleren of aan uw afgeleverde e-mails "open pixels" zijn toegevoegd en de links zijn ingepakt, door de binnenkant van de mail te bekijken (gebruik in Gmail het menu rechtsboven en kies "Origineel weergeven").

You’ll notice the open pixels aan de beginning and end of the HTML in the email. Each HTML link is also changed to have REF pointing naar de tracking domain.
Dat is alles wat je nodig hebt om SparkPost Signals te laten werken met PowerMTA's ingebouwde Engagement Tracking.
Voorkomen dat specifieke links in uw html e-mail worden gevolgd
You can prevent PowerMTA from tracking specific links, by setting the custom attribute data-msys-clicktrack to “0” :
<a href="#" data-msys-clicktrack="0">Example</a>
PowerMTA zal de link niet verpakken. Het zal ook dat attribuut verwijderen voordat het bericht wordt verzonden naar de ontvanger.
Selecteer welke PowerMTA verkeersstromen moeten worden gerapporteerd aan Signals
U kunt Signalen selecteren om actief te zijn:
Wereldwijd (dit is wat we in het bovenstaande voorbeeld gebruikten)
Voor sommige virtuele MTA's en niet voor andere
Voor sommige Virtual MTA pools wel en andere niet
Voor specifieke "Afzender" of "Van" adressen doorgestuurd door PowerMTA, in combinatie met de Virtual MTA / Virtual MTA pool selecties
This configuration is very powerful and is illustrated through a series of voorbeeld use-cases (v5.0) in the User Guide.
Testen of uw gebeurtenissen signalen bereiken
Hier is een weergave van SparkPost Signals, verbonden met PowerMTA. Je kunt zien dat de gezondheidsscore varieert.
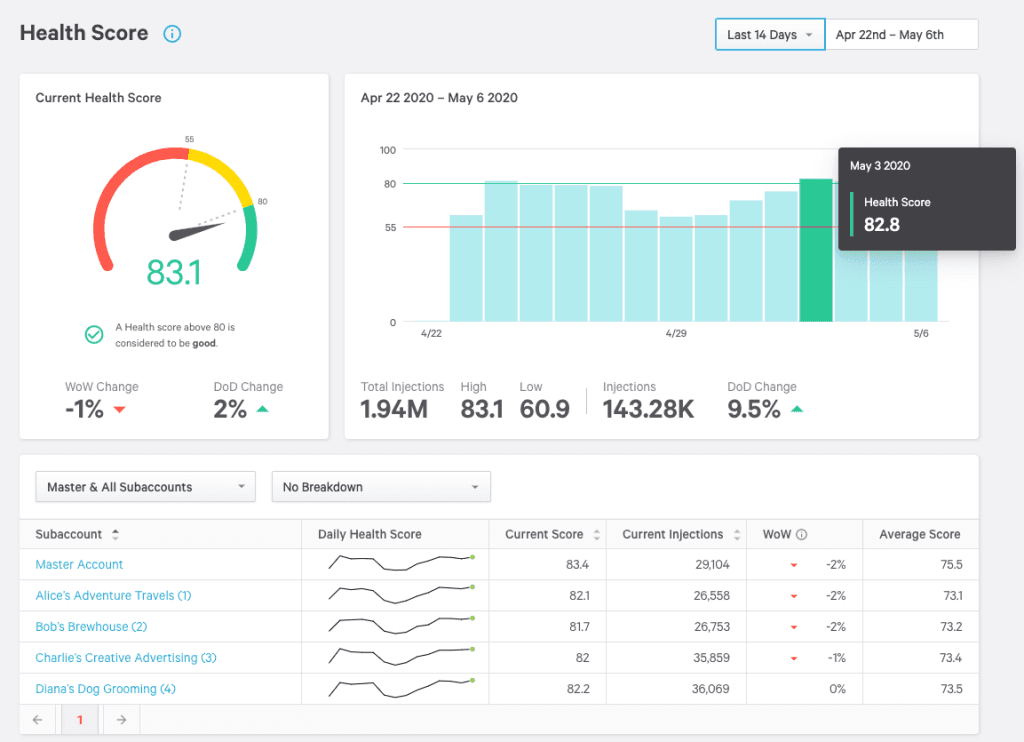
De campagnenamen zijn beschikbaar als rapportagefacetten, samen met Subaccount, IP Pool, Mailbox Provider en Sending Domain.
Naast het bekijken van de PowerMTA logs, kun je controleren of de gebeurtenisgegevens SparkPost bereiken door naar het Signals Integration scherm te kijken.
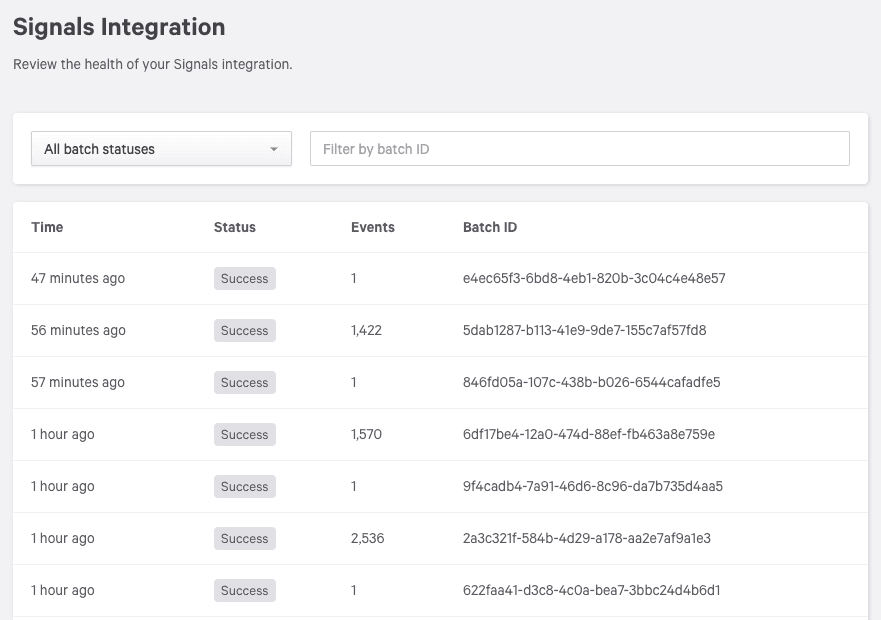
In your SparkPost Evenementen zoeken screen, you should see events appear within a few minutes. These will include Injection and Delivery events, as well as Bounce, and potentially Out-of-Band Bounce and Spam Complaint events, if you’ve already configured PowerMTA to handle those for you.
If you have Engagement Tracking enabled, you will also see open , initial_open , and click events.
Gebruik van betekenisvolle namen die goed naar voren komen in de rapportage
Setting up the PowerMTA VirtualMTA Pool names and Job names to be meaningful and human-readable is well worth doing. These show up directly in your SparkPost Signals facets and the Samenvattend verslag.
Zoals eerder vermeld, hoef je deze pools niet aan te maken in je SparkPost account. SparkPost haalt ze op uit je PowerMTA configuratie.
Hier zie je hoe PowerMTA configuratie termen zich vertalen naar SparkPost termen.
PowerMTA termSparkPost Rapporten / Signalen termRecipient Domain
(domain portion of “rcpt” field in Accounting file).Recipient DomainDe domain portion of the “Sender” or “From” header in the message relayed by PowerMTA.
(domain portion of “orig” in Accounting file).Sending DomainVirtualMTA (name)—VirtualMTA Pool (name)
(“vmtaPool” in accounting file)IP Pool (name)smtp-source-host a.b.c.d
(“dlvSourceIp” in accounting file)Sending IP a.b.c.dJob (name)
(“jobId” in accounting file)Campaign ID (name)—Template (name)“Subaccount” is not a native PowerMTA concept.
Echter, PowerMTA kan virtualMTAs, virtual MTA Pools, of Sender-or-From domeinen taggen met een subaccount ID voor SparkPost rapportage doeleinden.
Subaccount ID (nummer)FBL (gebeurtenis)Spamklacht (gebeurtenis)Remote Bounce (gebeurtenis)Out-of-Band bounce (gebeurtenis)
Setting up at least one smtp-source-host address also enables SparkPost to correctly identify the sending IP address so that it shows up on Injection and Delivery events, as well as in the Samenvattend verslag view.
Job names are set in PowerMTA via a header in the injected message. As well as enabling individual job control (pause/resume etc) which is useful in itself, PowerMTA passes the names through to SparkPost Signals reporting as “campaign ID”. See User Guide v5.0 sectie 12.8 "Een campagne volgen in PowerMTA met een JobID"..
There are a few things to be aware of regarding job naming. While SparkPost (with JSON format, and JSON escaping) allows characters such as <SPACE> in campaign names, mail headers are more restrictive. Valid characters allowed in the X-Job header are:
A-Za-z0-9!#$%&'()*+,-./:;<=>?@[\]^_{|}~
In other words, disallowed characters include <SPACE>, double-quotes “ and backtick `. If you’re used to working with X-Job names, this won’t be surprising, and your campaign ID names will “just work” on SparkPost reporting. If like me, you learned SparkPost first, you might want a tool to ensure your X-Job values are safe; see the bonus feature aan de end of dit artikel.
FBL-gebeurtenissen (Spam Complaints) en externe (out-of-band) bounces
PowerMTA kan FBL events (in SparkPost bekend als Spam Complaint events) en remote bounces (in SparkPost bekend als out-of-band bounces, omdat het antwoord enige tijd later terugkomt, in plaats van tijdens het SMTP gesprek) ontvangen en verwerken.
There are articles in the Port25 Klantenservice Forum on how to set up the Bounce Processor and the FBL Processor. If you are an existing PowerMTA user, you probably already have these.
Hier is de configuratie die ik heb gemaakt voor een demo, gebaseerd op deze artikelen en gericht op het hosten van PowerMTA in Amazon EC2.
Als je bekend bent met PowerMTA configuratie in dit gebied, kun je dit gedeelte overslaan, naar de volgende horizontale regel.
Configuratie van de injectie
We gebruiken poort 587 voor geïnjecteerde berichten, die over het openbare internet van een andere host komen. We moeten voorkomen dat slechte actoren deze dienst ontdekken en misbruiken, dus passen we gebruikersnaam/wachtwoord authenticatie en optionele TLS toe, vergelijkbaar met SparkPost SMTP injectie eindpunten.
We willen berichten van bronnen die correct zijn geauthenticeerd naar elke bestemming kunnen sturen. We willen ook een aparte luisteraar op poort 25 voor FBL en remote bounce reacties die geen authenticatie vereisen.
# IP adres(sen) en poort(en) waarop geluisterd moet worden naar inkomende SMTP verbindingen # smtp-listener 0.0.0.0:587 smtp-listener 0.0.0.0:25
In the following <source> declarations, we’re using username/password authentication and optional TLS to defend against rogue message injection. We also set rate limits on connections making failed password attempts.
Je opstelling kan anders zijn; als je bijvoorbeeld een privénetwerk hebt tussen de injector en PowerMTA, heb je geen wachtwoordauthenticatie nodig.
# One source rule for all injection, internal or external. Enforce auth, except for bounces and FBLs # <source 0/0> log-connections false log-commands false # WARNING: verbose! just for dev log-data false # WARNING: even more verbose! smtp-service true # allow SMTP service smtp-max-auth-failure-rate 1/min allow-unencrypted-plain-auth false allow-starttls true rewrite-list mfrom </source> <source {auth}> always-allow-relaying yes # only if the auth succeeds default-virtual-mta default process-x-job true </source>
The <source {auth}> declaration (zie hier. v5.0) applies once authentication has passed. Here, it allows onward relaying, sets up the default virtual MTA group to use, and adds the X-Job header (which will be reported by SparkPost Signals as campaign_id).
De herschrijflijst brengt geïnjecteerde berichten in kaart om een specifiek MAIL FROM-domein (ook wel bounce-domein of Return-Path:) te gebruiken.
# # Rewrite the MAIL FROM address to match the bounce domain # <rewrite-list mfrom> mail-from *@pmta.signalsdemo.trymsys.net *@bounces.pmta.signalsdemo.trymsys.net </rewrite-list>
Then we set up our TLS-configuratie and SMTP username / password, according to huidige aanbevelingen.
# # Secure the inbound service with username, password and TLS. SMT 2020-06-15 # smtp-server-tls-certificate /etc/pmta/pmtasignalsdemo.pem smtp-server-tls-allow-tlsv1 false smtp-server-tls-allow-tlsv1.1 false smtp-server-tls-allow-tlsv1.2 true smtp-server-tls-allow-tlsv1.3 true # # SMTP users (authenticated via SMTP AUTH) # <smtp-user SMTP_Injection> password ##PUT YOUR PASSWORD HERE## authentication-method password </smtp-user>
We can check that the (insecure, verouderd) TLS v1.0 is not accepted using my favorite SMTP test tool, swaks.
swaks --server pmta.signalsdemo.trymsys.net --port 587 --to test@trymsys.net --from any@sparkpost.com --tls --tls-protocol tlsv1
Dat zien we:
*** TLS opstarten mislukt (connect(): error:00000000:lib(0):func(0):reason(0)) *** STARTTLS geprobeerd maar mislukt
Likewise for -tls-protocol tlsv1_1.
Let’s also apply DKIM signing on our outgoing messages, as it’s good practice (I followed deze instructies to set up the key).
# DKIM # domain-key mypmta, pmta.signalsdemo.trymsys.net, /etc/pmta/mypmta.pmta.signalsdemo.trymsys.net.pem
FBL- en OOB-configuratie
Now .. finally .. we declare which specific domains are open for remote bounce and FBL responses. We don’t want to relay those anywhere (to prevent backscatter aanvallen), just internally process those responses.
# # Enable Bounce and FBL processing on specific domains # relay-domain pmta.signalsdemo.trymsys.net relay-domain bounces.pmta.signalsdemo.trymsys.net relay-domain fbl.pmta.signalsdemo.trymsys.net <bounce-processor> deliver-unmatched-email no deliver-matched-email no <address-list> domain pmta.signalsdemo.trymsys.net domain bounces.pmta.signalsdemo.trymsys.net </address-list> </bounce-processor> <feedback-loop-processor> deliver-unmatched-email no deliver-matched-email no <address-list> domain fbl.pmta.signalsdemo.trymsys.net </address-list> </feedback-loop-processor>
You can see I set up two bounce domains, as I was playing around with using/not using the mfrom rewrite rule.
The FBL domain is usually then registered with external services such as Microsoft SNDS; see this article for more information. For this demo, the FBLs will be coming from the Stuiterbak, so no need to register.
Testen van de SMTP-luisteraar
Het is belangrijk om te testen of uw SMTP-luisteraar autorisatie vereist voor alle algemene bestemmingen, en alle berichten weigert die niet specifiek zijn gericht aan de FBL en remote-bounce domeinen.
swaks --server pmta.signalsdemo.trymsys.net --port 25 --to test@strange.pmta.signalsdemo.trymsys.net --from any@sparkpost.com
Uit het antwoord blijkt, zoals verwacht, dat heruitzending wordt geweigerd:
550 5.7.1 relaying denied for recipient in "RCPT TO:<test@strange.pmta.signalsdemo.trymsys.net>
(Einde van de beschrijving van de demo-opstelling).
VirtualMTA opzet en naamgeving
PowerMTA VirtualMTAs (en VirtualMTA pools) zijn krachtige functies voor het beheren van berichtenstromen, en PowerMTA / SparkPost Signals rapportage functies werken het beste met deze actief.
# # Route all outgoing traffic through this virtual mta / pool. # Declare the delivery IP address here, so that SparkPost signals ingest injection (aka "reception") events # will carry the correct sending_IP attribute # <virtual-mta mta1> smtp-source-host 172.31.25.101 pmta.signalsdemo.trymsys.net </virtual-mta> <virtual-mta-pool default> virtual-mta mta1 <domain *> max-smtp-out 20 # max. connections *per domain* bounce-after 4d12h # 4 days, 12 hours retry-after 10m # 10 minutes dkim-sign yes </domain> </virtual-mta-pool>
The virtual-mta-pool setting is reported in SparkPost as “IP Pool”, and is available as a SparkPost Signals reporting facet (the drop-down menu underneath the charts).
Het Overzichtsrapport toont ook IP Pool als een "Groep door" rapportage facet.
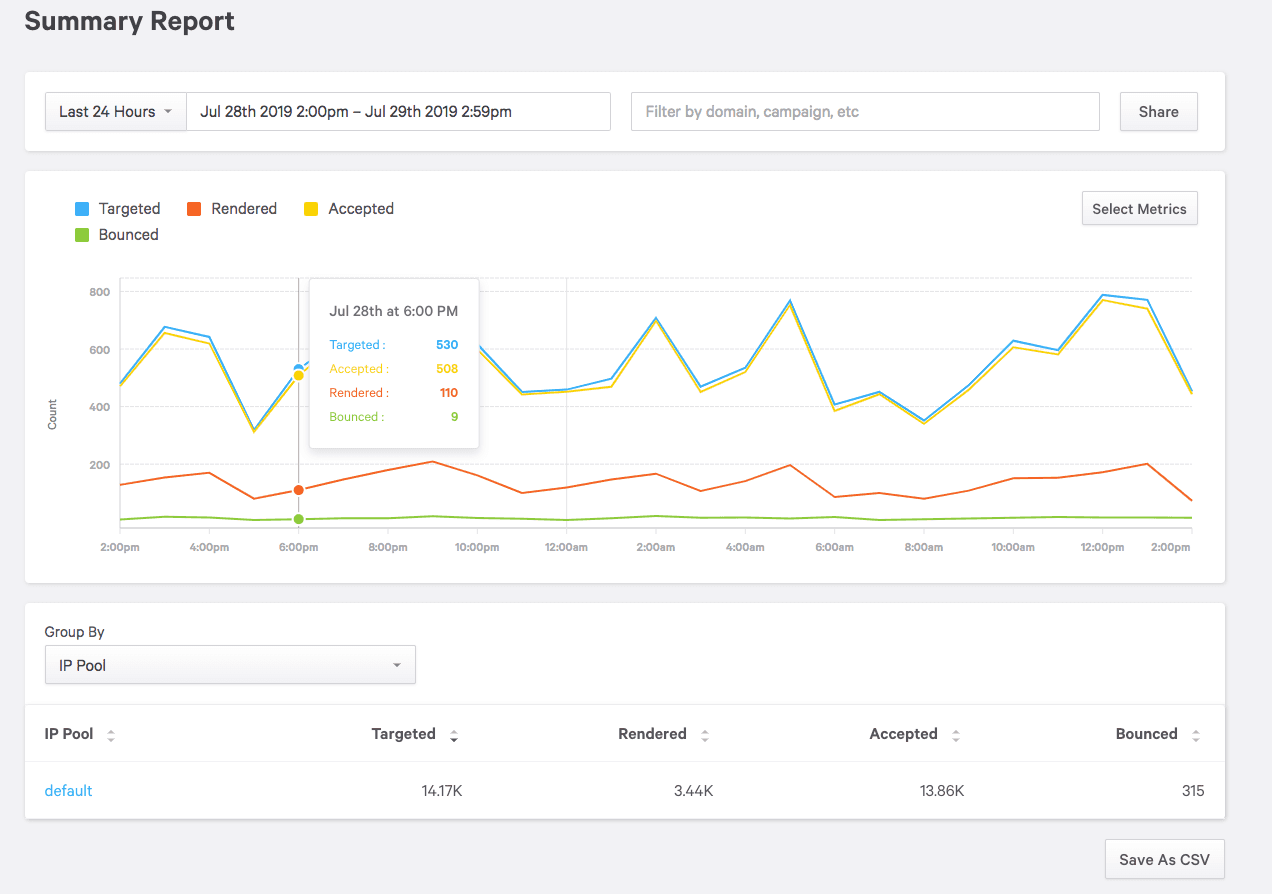
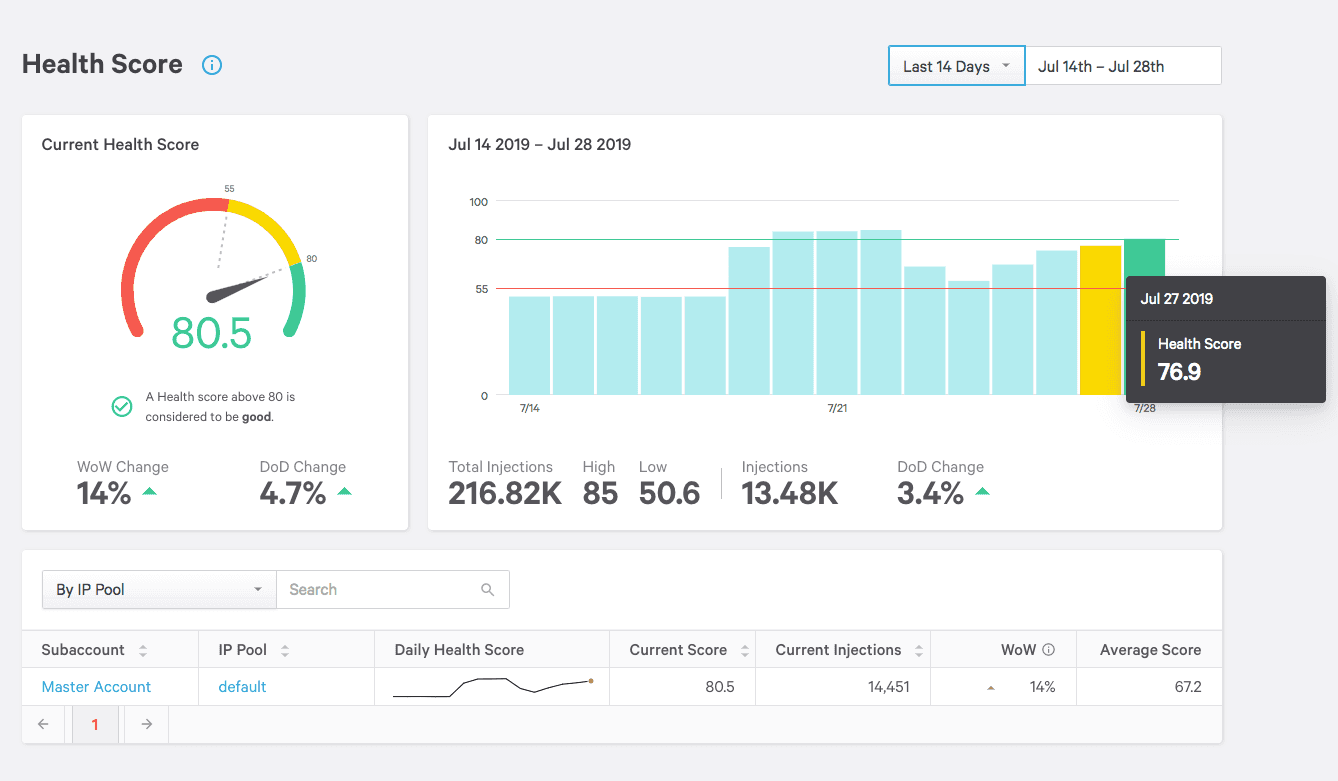
As noted earlier in this article, setting up at least one smtp-source-host address also enables SparkPost to correctly identify the sending IP address, so that it shows up on Injection and Delivery events, and on the Summary Report:

That’s all you need to get a basic integration working between PowerMTA and SparkPost Signals. You’ll find the volledig configuratiebestand voorbeeld hier.
Voordat je gaat, hier is de bonus waar ik het over had.
Bonusfunctie: X-Job naam controle/filtering
To ensure any character string is safe for use as a PowerMTA X-Job name, here’s a simple Python function to map any unsafe characters to an underscore “_”
import re def pmtaSafeJobID(s): """ :param s: str :return: str Map an arbitrary campaign ID string into allowed chars for PMTA X-Job header. See https://download.port25.com/files/UsersGuide-5.0.html#tracking-a-campaign-in-powermta-with-a-jobid Specifically disallow <sp> " ` but allow through most other chars. """ # Note have to escape ' - [ ] and double-escape \ - see https://docs.python.org/3/library/re.html disallowedChars = '[^A-Za-z0-9!#$%&\'()*+,\-./:;<=>?@\[\\\\\]^_{|}~]' return re.sub(disallowedChars, '_', s)
This uses Python reguliere uitdrukkingen in a specific way. It declares the set of disallowed characters using the “set complement” operator ^ rather than list all allowed chars. That means we catch (and make safe) characters beyond the usual 7-bit set. We can show that using this test fragment:
s='' voor i in range(32, 256): s += chr(i) print(pmtaSafeJobID(s))
Geven
_!_#$%&'()*+,-./0123456789:;<=>?@ABCDEFGHIJKLMNOPQRSTUVWXYZ[\]^__abcdefghijkl mnopqrstuvwxyz{|}~___________________________________________________________ ______________________________________________________________________
You can see that <SPACE>, double-quotes “, and backtick `, as well as all characters beyond ~ are mapped to underscore.