
Dec 2, 2021
How to create leads or cases in Salesforce with Flow Builder
Bird offers many direct integrations that allow you to plug your communications into the tools and platforms already used in your business.
Using Flow Builder's native integrations, custom connections via HTTP requests and webhooks, you can easily enrich customer profiles, enable rapid sales engagement and drive more qualified leads.
Today, we will discuss our integration with Salesforce.
With this integration you can:
Add leads into Salesforce from different communication channels: WhatsApp, Instagram, Telegram, WeChat, LINE, Messenger, Google Business Chat, Viber, etc.
Create cases in Salesforce to keep records, and store key data inside the cases from all your channels
Implement flexibility and automation of lead/case creation at any point in your sales funnel
In this guide, you will learn how to:
Set up your Salesforce properly
Connect Salesforce with Bird
Troubleshooting errors when connecting Salesforce
Create a flow in Flow Builder that will push data into Salesforce
Connect WhatsApp with Salesforce to send your leads
Connect Viber with Salesforce to send your cases
Requirements for Salesforce integration
Before you start building the logic in Flow Builder, you need to have the following requirements ready:
A Bird account: Make sure you have access as administrator.
A Salesforce Account: You need “Administrator access”
Step 1: Go to Connected Apps in Salesforce to integrate with Bird
To access the Connected Apps section in Salesforce (Lighting Experience), follow these steps:
Login to Salesforce as an administrator
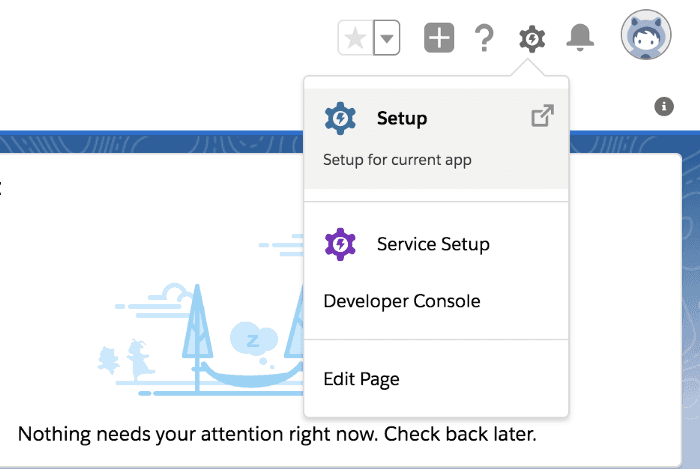
Select Setup in the drop-down list of the account (in the upper-right corner)
On the left-hand pane, go to App Manager > New Connected App
Please note: if you face the viewing issue below, please click “Click here to open this page in Salesforce Classic.”

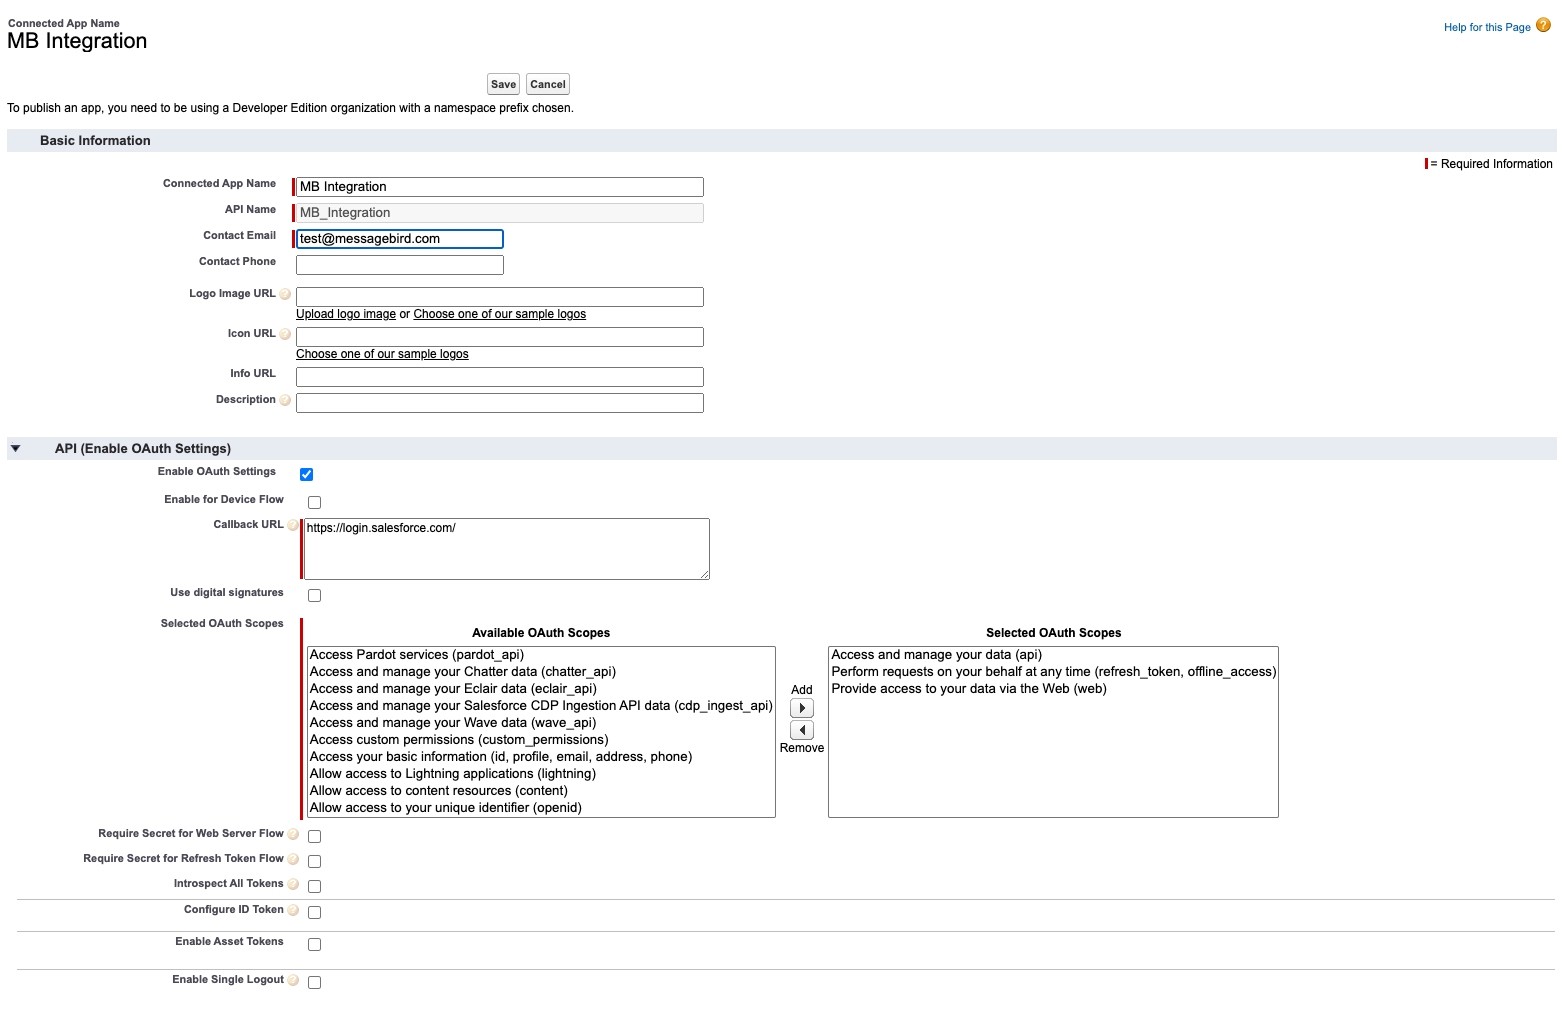
On the New Connected App page, fill the following required fields under Basic Information:
Connected App Name, e.g. Bird Integration.
API name, e.g. Bird_Integration
Contact Email, e.g. xxx@contactemail.com
Go to API (Enable OAuth Settings), and select Enable OAuth Settings.
In the Callback URL field, enter https://login.salesforce.com/
In the Selected OAuth Scopes field, select Access and manage your data (api)
Provide access to your data via the Web (web)
Perform requests on your behalf at any time (refresh_token, offline_access)
Click Add
Click the Save button to save the new Connected App.
In the Connected Apps (Apps > App Manager) list, find the App that you just created, and then click Manage.
On the page that opens, click the Edit button.
Under OAuth policies, select All users may self-authorize in the Permitted Users list
In the IP Relaxation, select Relax IP restrictions
In the Refresh Token Policy, click Refresh token is valid until revoked. Under Session Policies, Select Timeout value (24 hours), click the Save button

Go back to the Connected Apps (Apps > App Manager) list, and click the App that you just created, and then click on View.
Go to API (Enable OAuth Settings) and note down the Consumer Key and Consumer Secret. You need this key and secret for the configuration of credentials in MessageBird’s Salesforce integration.
Step 2: Obtaining tokens from Salesforce to authorize access
In Salesforce, access tokens have a limited lifetime specified by the session timeout. If an application uses an expired access token, a “Session expired or invalid” error will be shown.
Use a refresh token during the authorization process to get a new access token. Using a new token will ensure that the access token is always live.
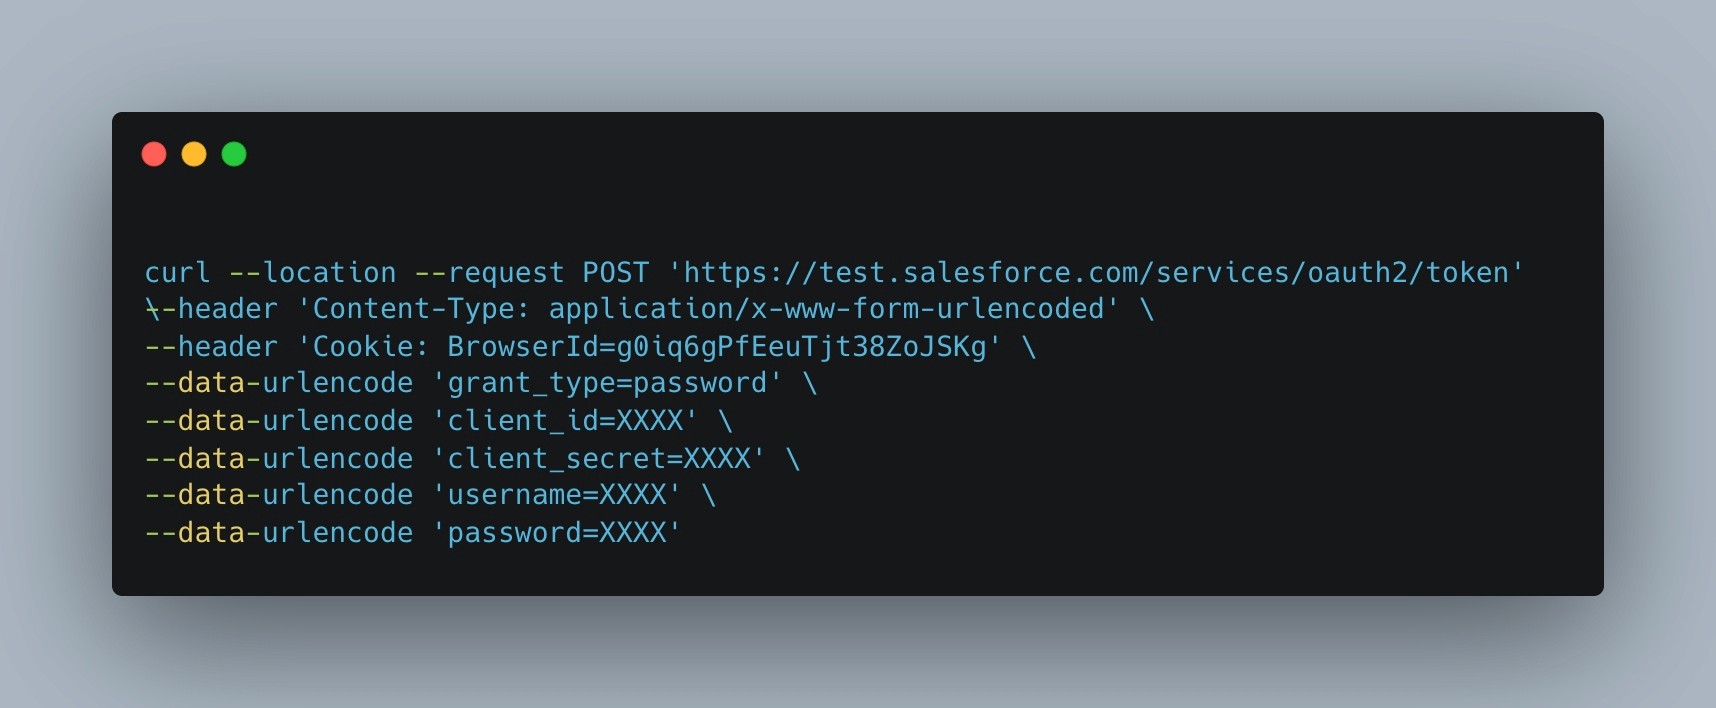
Get your instance URL. Send the following curl request to obtain the instance URL.
client_id = Consumer Key
client_secret = Consumer Secret
username = Salesforce login username
password = Salesforce login password
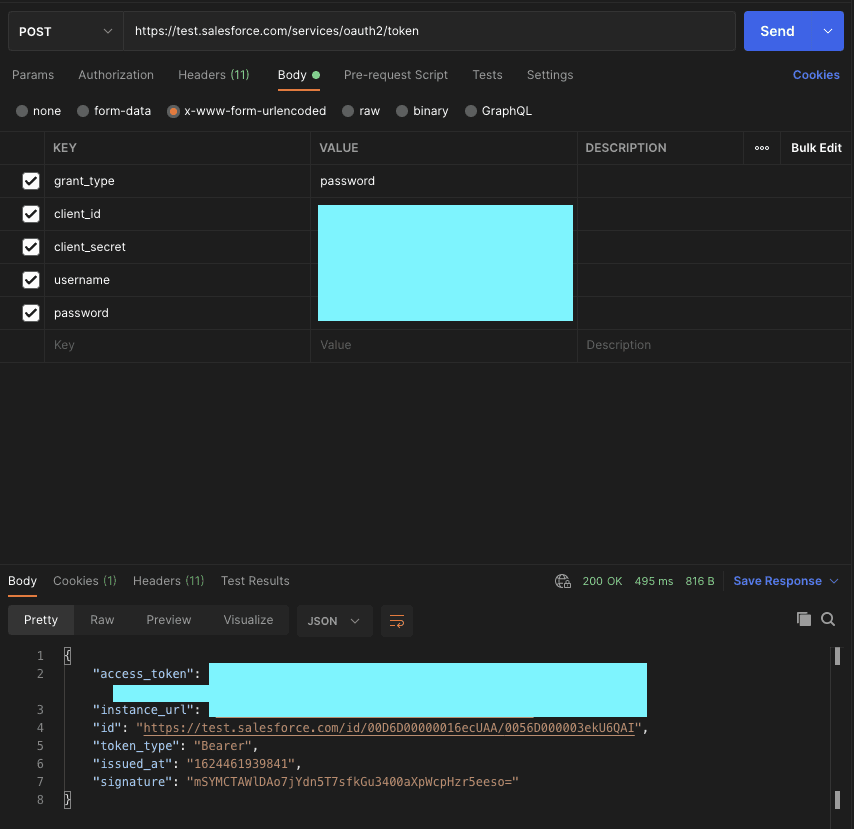
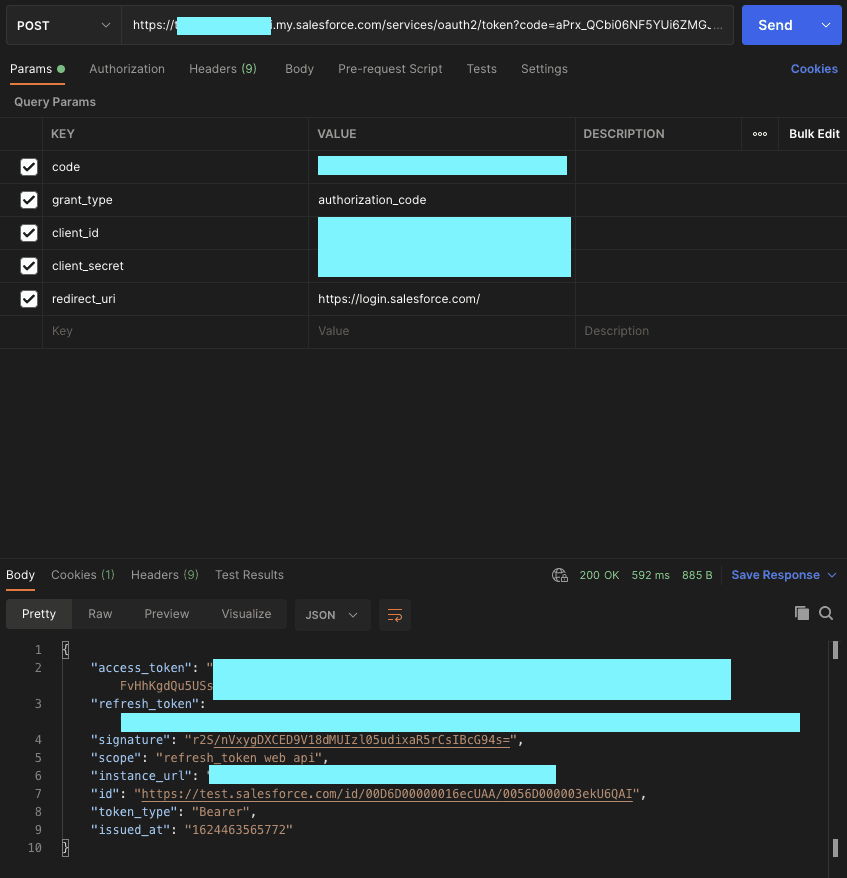
If you are not familiar with curl you can use Postman to send the request. Follow these steps:
Get your code. Use your favorite browser, then enter the following request URL in a new tab to get the code.
<CONSUMER_KEY> should be replaced with the obtained Consumer Key in the above step
<YOUR_INSTANCE> should be replaced with your instance name
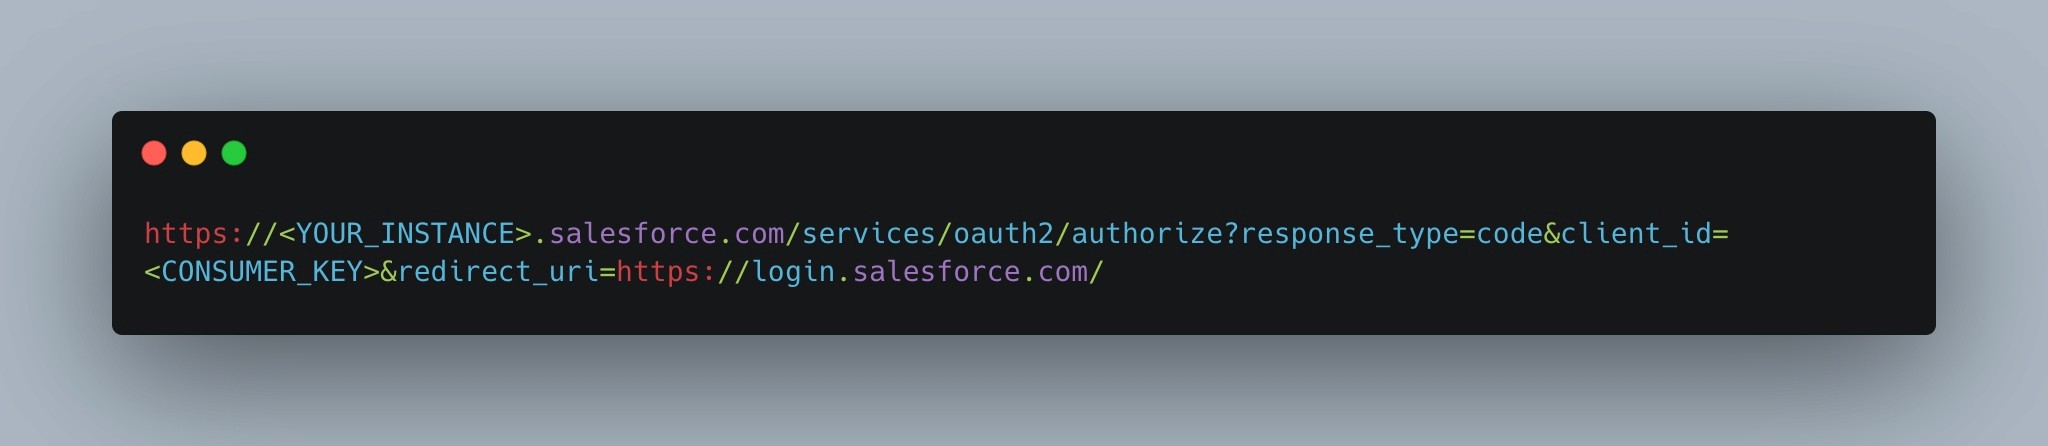

Next, enter your request URL in the browser. Allow access if any alerts popup. You will then see the browser redirected to a URL like the one below. You can obtain the code using that same URL.
https://login.salesforce.com/?code=XXXX
Get access token & refresh token: Send the following curl request to obtain the tokens.
<CODE> should be replaced with the code you obtained in the above step.
<CONSUMER_KEY>
<CONSUMER_SECRET> should be replaced with obtained keys with the created Connected App
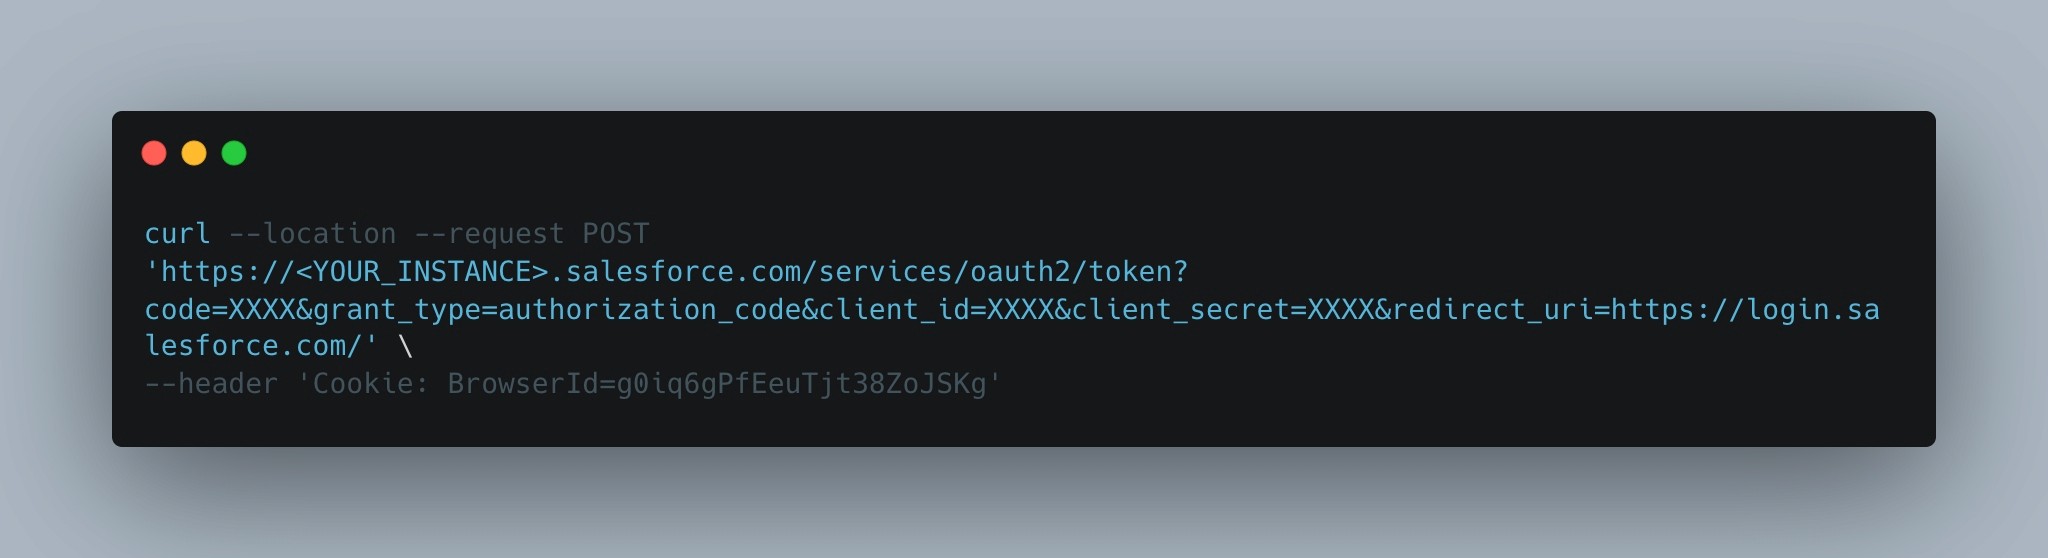
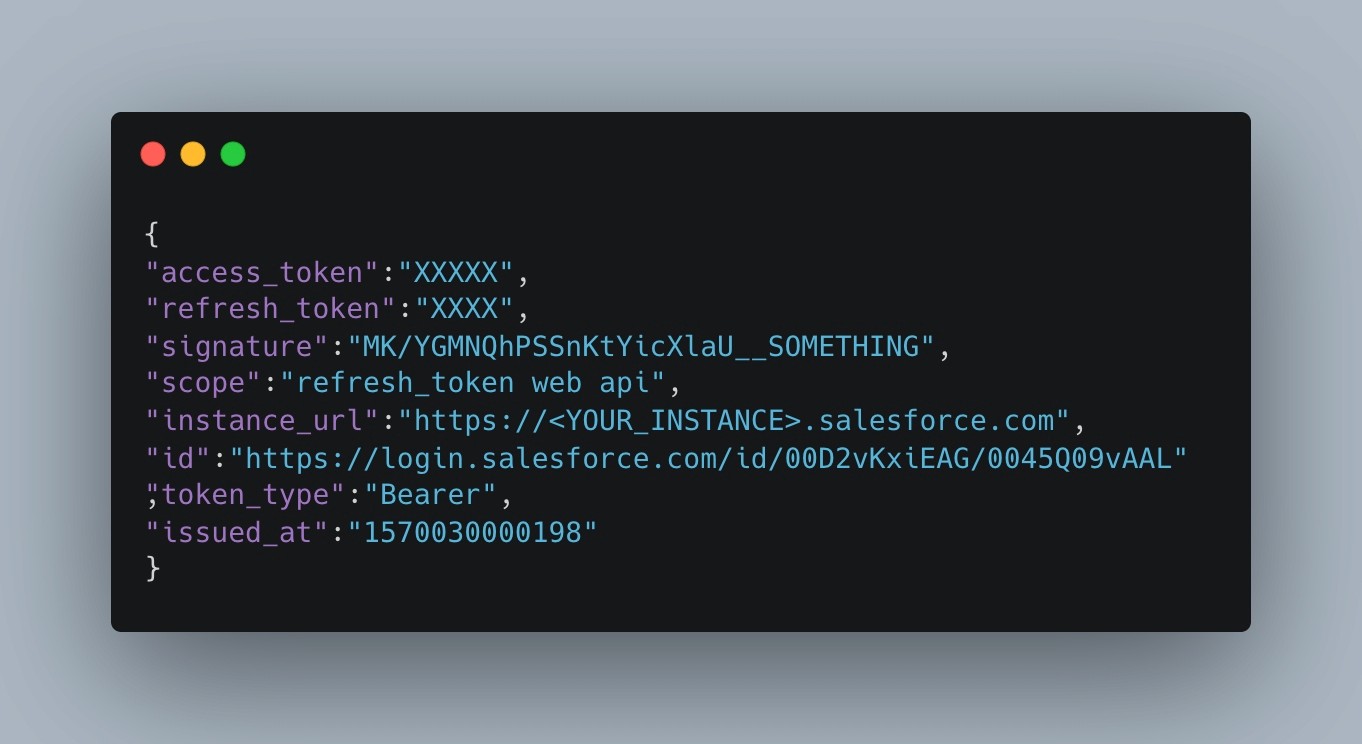
You can obtain the access_token and refresh_token from the response.
If you are not familiar with curl you can use Postman to send the request. Follow these steps:
Troubleshooting your Salesforce connection
The most common error encountered when integrating Salesforce with Bird and how to fix it:
‘REST API is not enabled for this Organization’ Issue
When you are trying to send a request to the salesforce API using the above credentials, sometimes you will get this error.
REST API is not enabled for this Organization.
You can resolve this error by following the below steps.
Click on Setup in the right top corner.
Go to ADMINISTRATION > Manage Users and click on Profiles.

Click Edit on the specific profile you want to update.
Scroll down and go to Administrative Permissions and check the API Enabled checkbox.
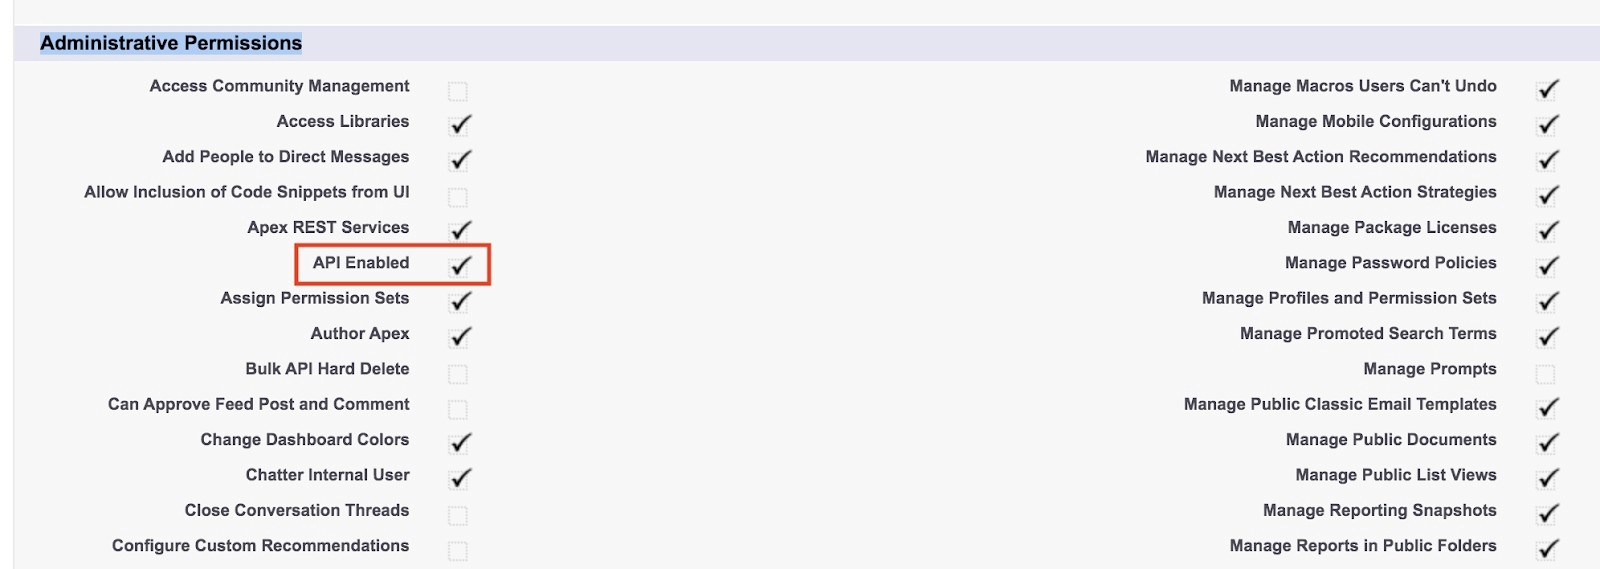
Don't forget to go down the page and click Save.
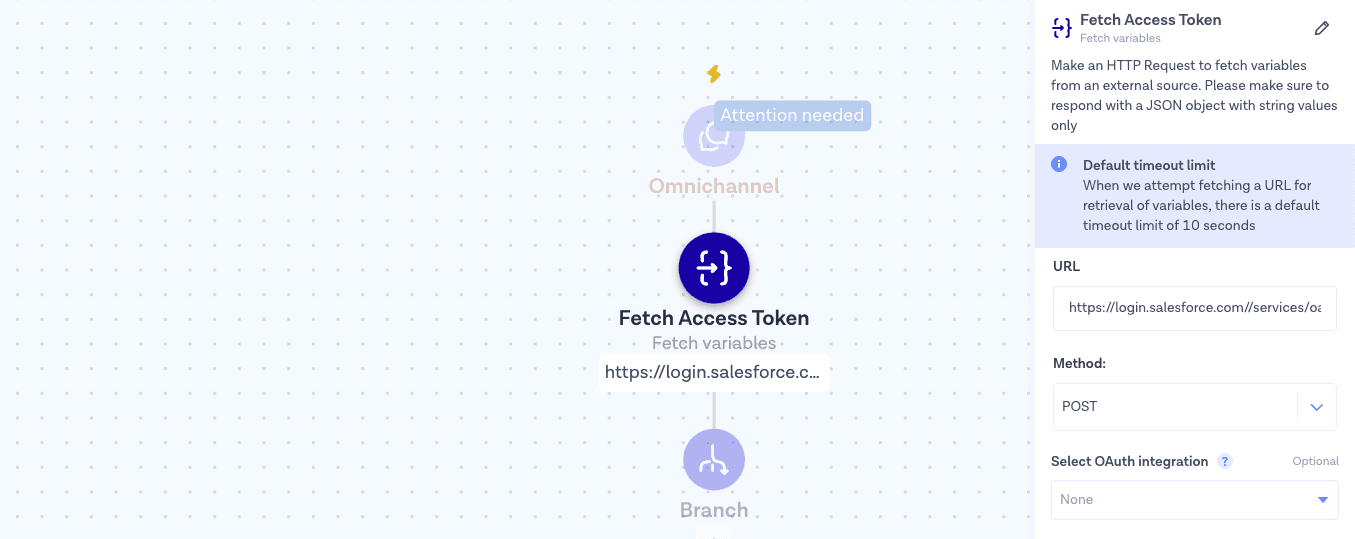
Step 3: Create a new flow in Flow Builder to create leads or cases
The configuration of Salesforce is done. Now, let’s start a new flow. This template will help you connect your favorite communication channel with Salesforce and push new leads or cases for your team to follow up:
Log in to your Bird Dashboard and go to Flow Builder.
Download the sample flow that you will be using.
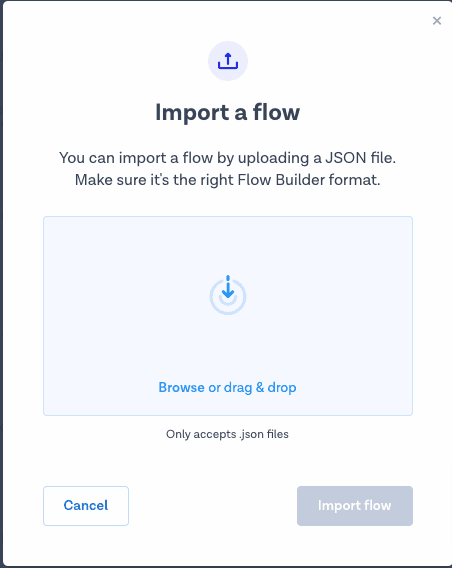
Import the flow with the import function.
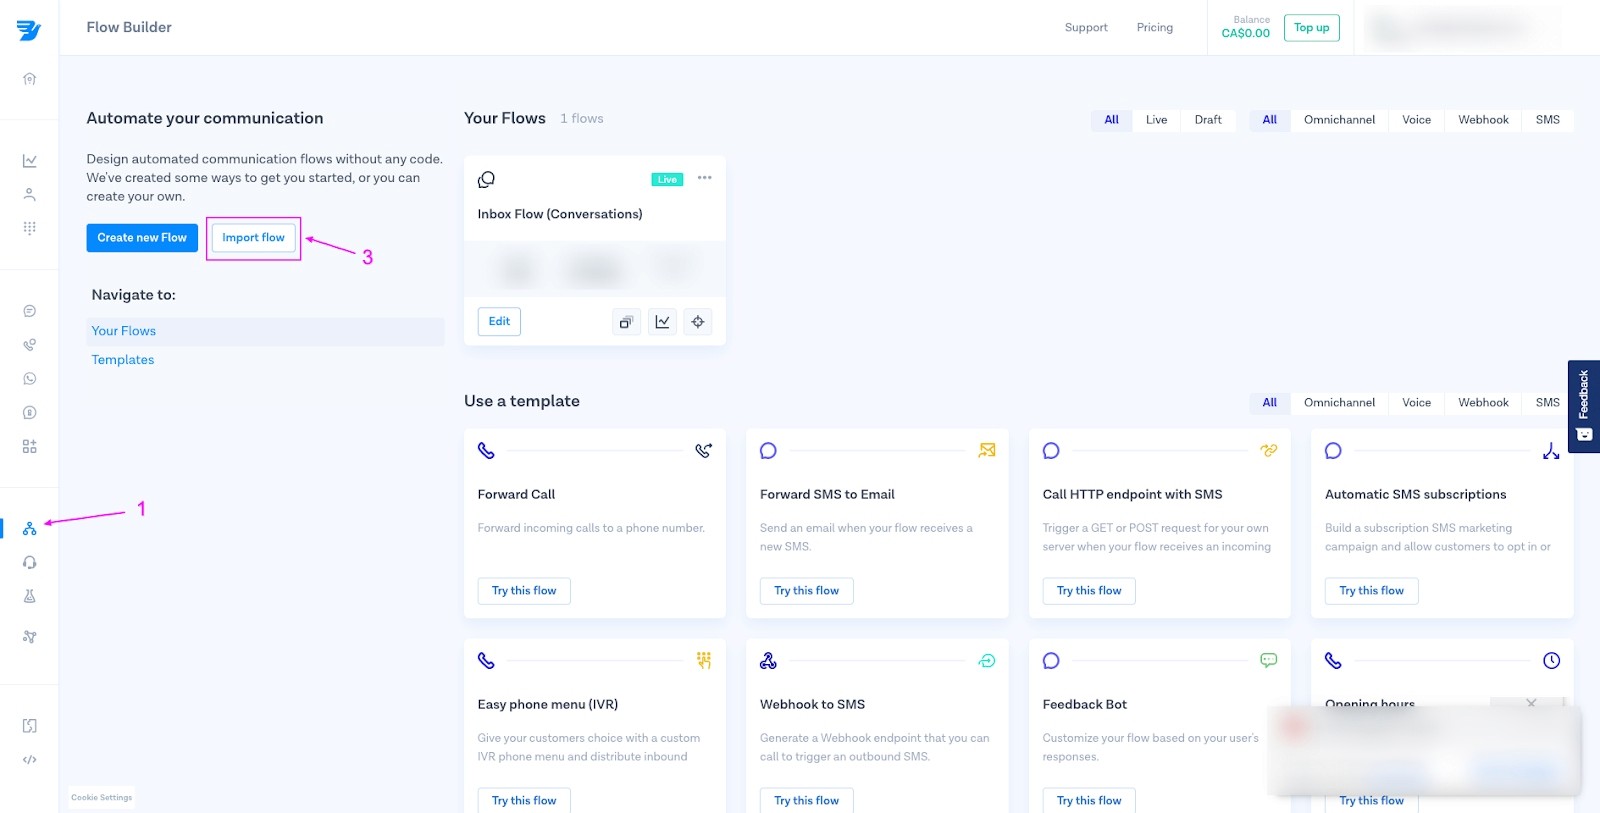
Attach the channels you want to use to create leads/cases into Salesforce. Then, you can publish this flow.
Using Salesforce with WhatsApp and Viber
This template flow will allow you to connect your favorite channels (WhatsApp, Viber, SMS, etc.) with Salesforce. The following examples, will show how to connect Salesforce to create leads on:
WhatsApp
Viber
Keep in mind that you can change the channel or use case depending on your needs.
You should be able to see your flow on your screen.
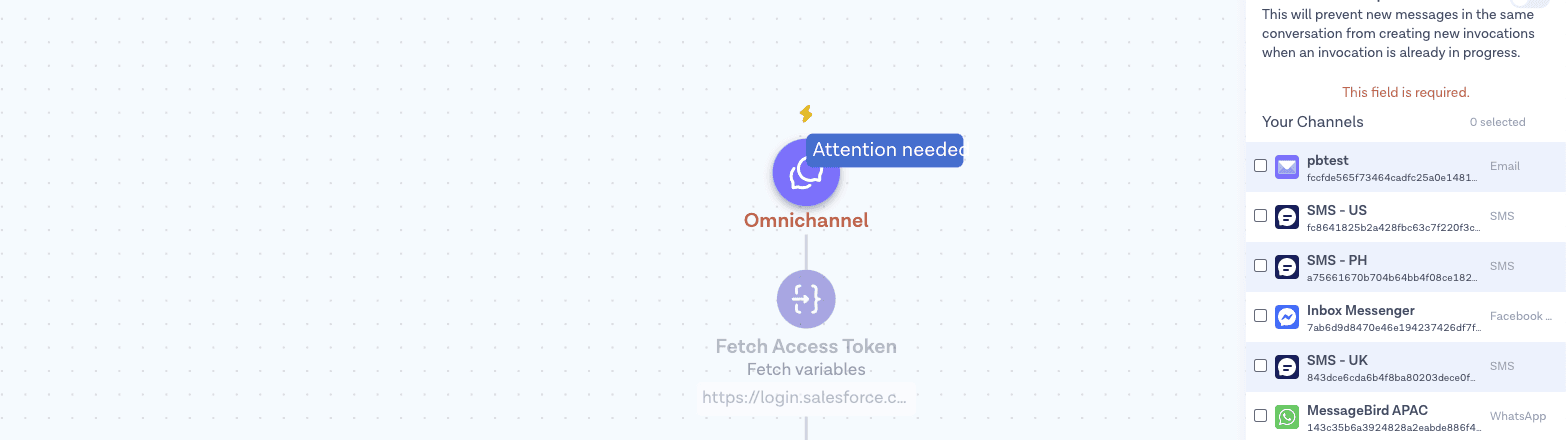
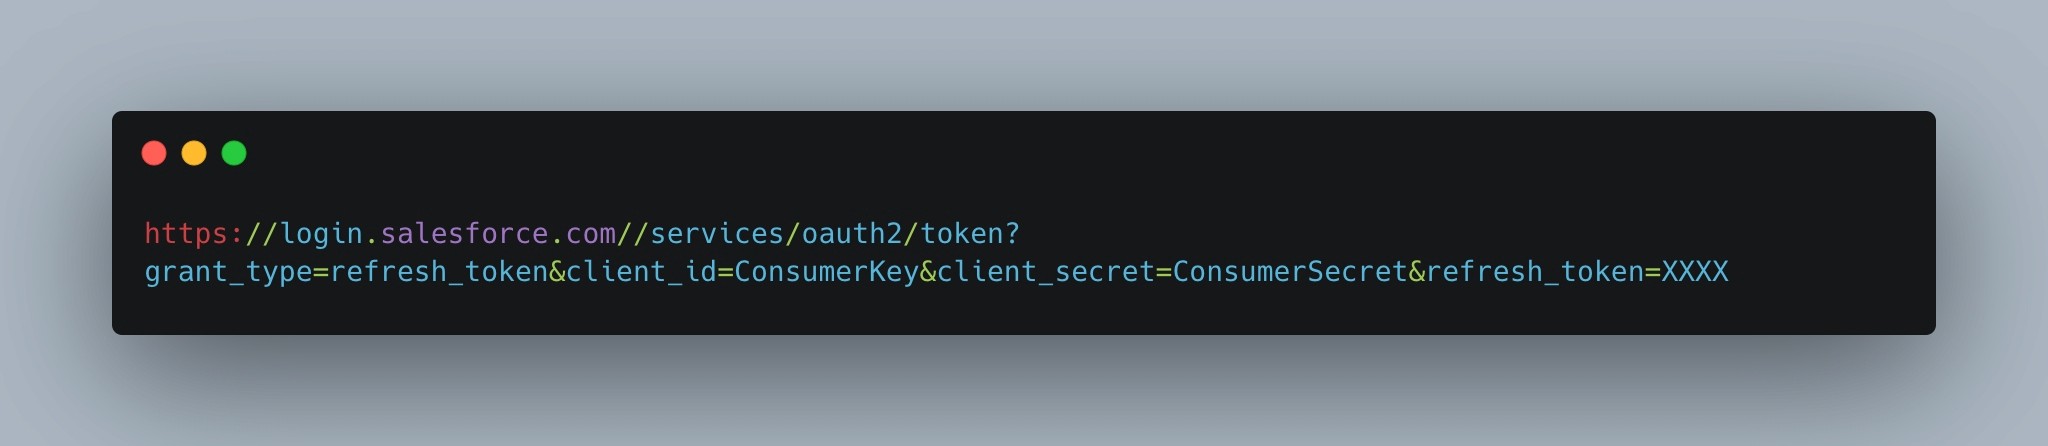
Fetch your access token before activating your flow.
API endpoint is as follows:
client_id = Consumer Key
client_secret = Consumer Secret,
For the refresh_token, please refer to step 2.3.
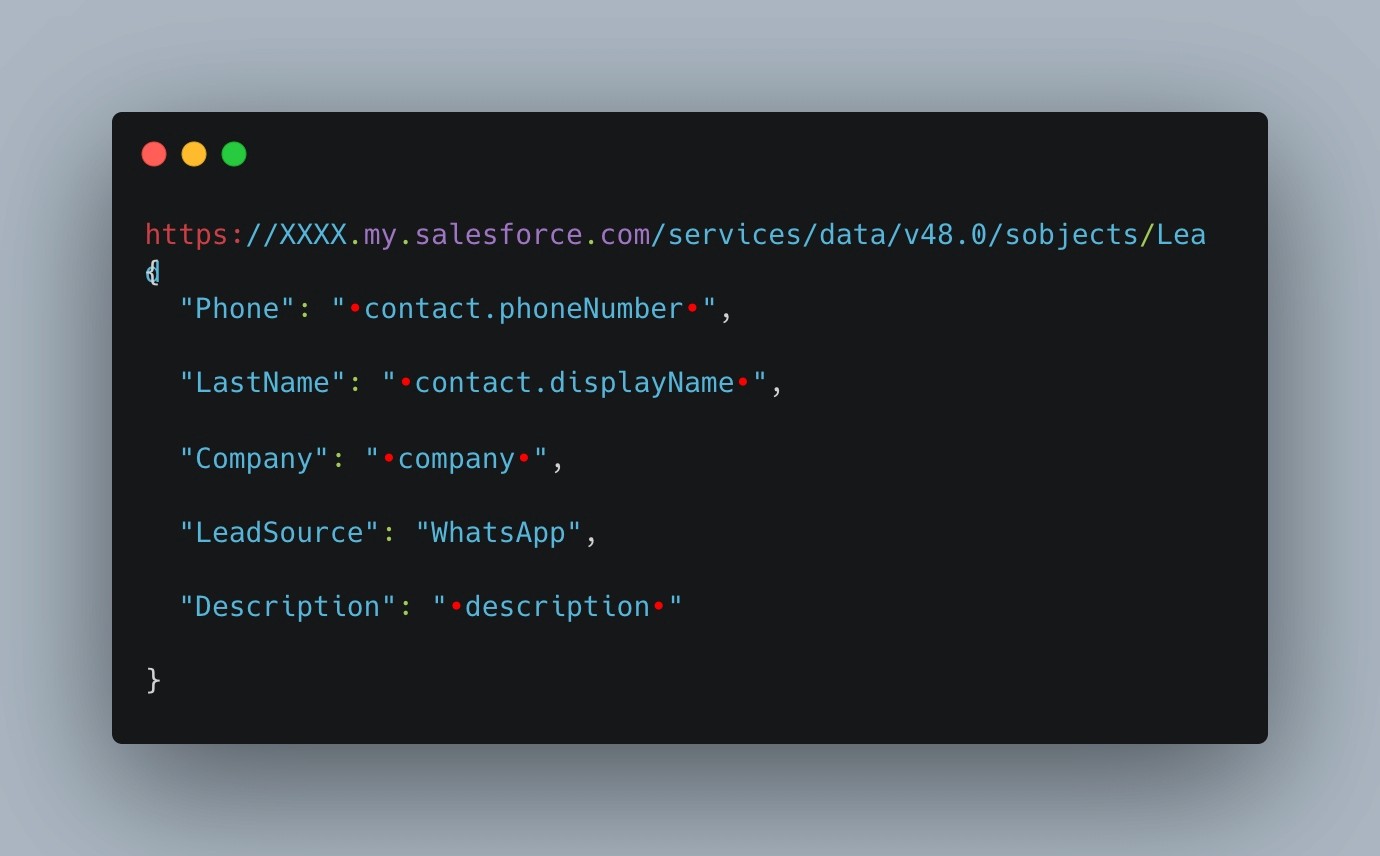
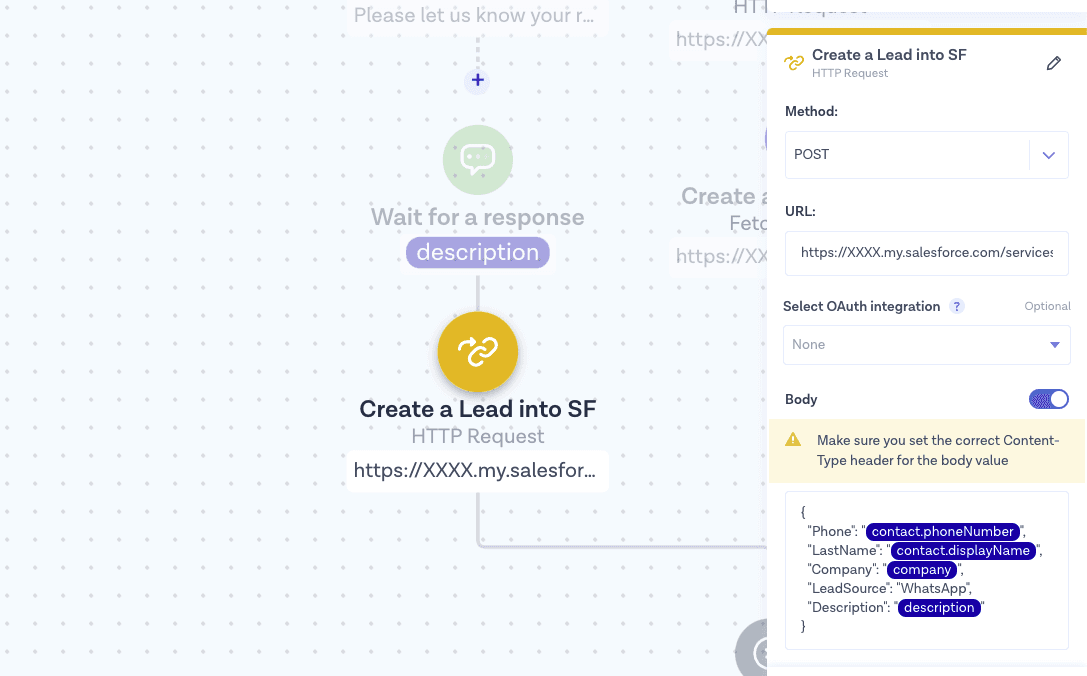
Create a Lead into Salesforce with WhatsApp
Replace https://XXXX.my.salesforce.com with your instance URL. Phone, LastName, Company, LeadSource, Description are the field names from Salesforce.
You can find them under Setup > Object manager > Lead > Fields & Relationship.
Create a Case into Salesforce with Viber
Replace https://XXXX.my.salesforce.com with your instance URL. Phone, LastName, Company, LeadSource, Description are the field names from Salesforce. You can find them from Setup > Object manager > Lead > Fields & Relationship.
The output variable ID is the case ID returned from Salesforce.

Congratulations!
You have just successfully connected Salesforce with WhatsApp and/or Viber to create leads and cases for your team to enable faster engagement and drive more qualified leads.
If you have any questions about your new flow or our Salesforce integration, please reach out to us here.